A while back my friend recommended that I try WezTerm. I’d been an iTerm 2 stalwart for the better part of a decade, but not to be too narrow-minded I conceded, started it up, and saw this:
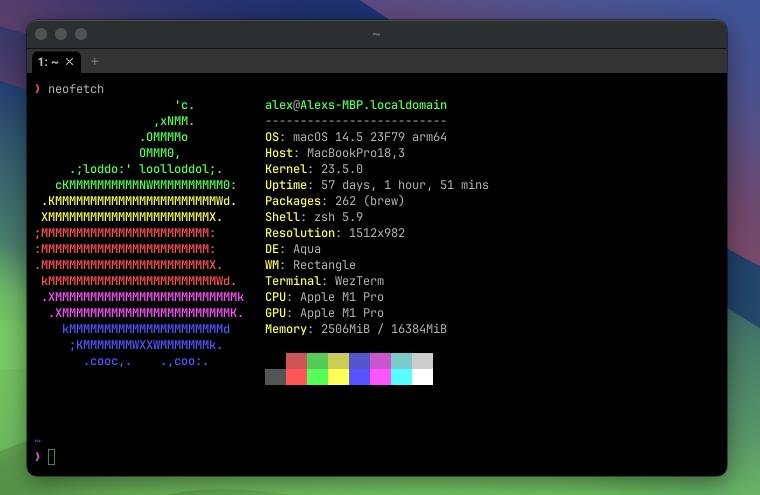
Does the job, sure, but doesn’t feel quite right. Okay then, experiment over. Back to iTerm…
Fast forward a couple of months and I got the itch to try a new terminal again. I wanted to use one whose config was entirely text based so I could pop it in to my dotfiles and share it across my work and personal machines. A few terminals already do this, but whispers of WezTerm’s powerful API and Lua config got me particularly interested.
I tried it again with a bit more patience and I’m glad I did. My terminal is prettier than it’s ever been, more functional, and I can finally justify my mechanical keyboard purchase with all the keybindings I’ve configured.
This post is an introduction to configuring WezTerm based on the setup that I eventually landed on. I’d consider it relatively low-frills. Most of what I talk about here can already be found in WezTerm’s docs, but as they’ve got a large surface area, I’m hoping this post will be a useful jumping off point for WezTerm beginners.
We won’t be looking at some of WezTerm’s key features, like custom hyperlinks highlighting rules, searchable scrollback, quick copy mode, and image support (you can find more details here).
The feature I find most exciting about WezTerm is the flexibility of its Lua config, so we’ll be focusing on that. This includes configuring appearance, keybindings, multiplexing, workspace navigation, status bar setup, and dynamic theming. By the end of it all, we’ll have a terminal that looks like this:
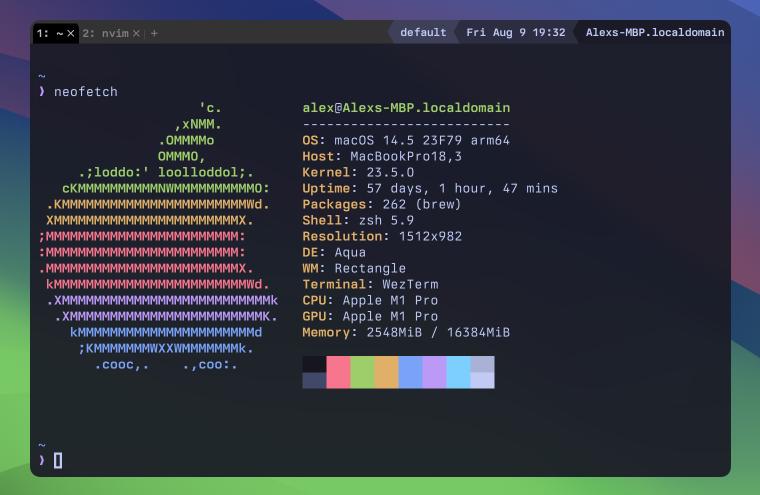
Subtly prettier than the default, and with some great features to boot.
I use macOS, so what follows is focused on ergonomics that make WezTerm great there. I haven’t tested my config on other systems, but I’m not doing anything too bespoke so things should be portable (WezTerm works pretty much everywhere).
tl;dr? Here’s a gist containing the config we’ll end up with.
Pre-flight checks
Start by installing WezTerm. Instructions for this are on WezTerm’s site. If you’re on macOS and reading this you probably have Homebrew installed, so $ brew install wezterm will do the trick.
Now launch WezTerm, and you’re already winning.
A note on Lua
My favourite WezTerm feature is its use of Lua for defining config. Unlike terminals where your settings are adjusted via the UI (iTerm 2), your WezTerm config lives in your dotfiles and is portable across all your machines.
And unlike other terminals where your configuration is written using a data serialization format like YAML or TOML (Alacritty, kitty), with Lua you can more easily achieve complex configs by leveraging dynamic scripts.
Granted, Lua is a programming language so it is trickier to learn than YAML or TOML, but it’s still remarkably simple. If you’ve used another dynamic programming language (e.g. Ruby, Python, JavaScript) - you should be able to read the Lua code in this post easily. For achieving more complex configs, I’d recommend diving deeper into the language. Its Getting Started guide is a good place to… get started.
Config files, and the best feedback loop in town
WezTerm supports loading in its config from all the usual places on your system (docs). For this guide we’re going to be creating our config in $XDG_CONFIG_HOME/wezterm/wezterm.lua. On most systems (including macOS) this resolves to ~/.config/wezterm/wezterm.lua. Using a directory to store our config instead of dumping it in ~/.wezterm.lua will let us keep our config logically grouped as we split some of it out into different files.
Create the wezterm.lua file on that path, and add this boilerplate to it:
-- Import the wezterm module
local wezterm = require 'wezterm'
-- Creates a config object which we will be adding our config to
local config = wezterm.config_builder()

-- (This is where our config will go)

-- Returns our config to be evaluated. We must always do this at the bottom of this file
return config
Save the file and all going well… nothing will happen. Well, at least nothing appeared to happen, but what WezTerm did behind the scenes is quite magical. It watched your config file, and when it changed it auto-reloaded instantly. This feature makes for a wonderfully tight feedback loop where you don’t need to restart your terminal to see the effects of your new config.
We can quickly test this auto-reload by adding some invalid syntax and seeing what happens. Replace the call to wezterm.config_builder() with wezterm.config_builderZ(), save, and you should immediately see a window pop-up with:
runtime error: [string "/Users/alex/.config/wezterm/wezterm.lua"]:2: attempt
to call a nil value (field 'config_builderZ')
stack traceback:
        [string "/Users/alex/.config/wezterm/wezterm.lua"]:2: in main chunk
How’s that for a feedback loop? Fix the error and save the file again.
This time, have your config log something:
wezterm.log_info("hello world! my name is " .. wezterm.hostname())
Save. Now… where did that log go? Press CTRL + SHIFT + L to bring up the debug overlay (docs) and lo and behold, your beautiful log was waiting for you all along. Not only that but what you’re looking at is a full Lua REPL. Enter 1 + 1 and you’ll see the result. Enter wezterm.home_dir and you’ll see the result of accessing the home_dir entry on the wezterm module (docs).
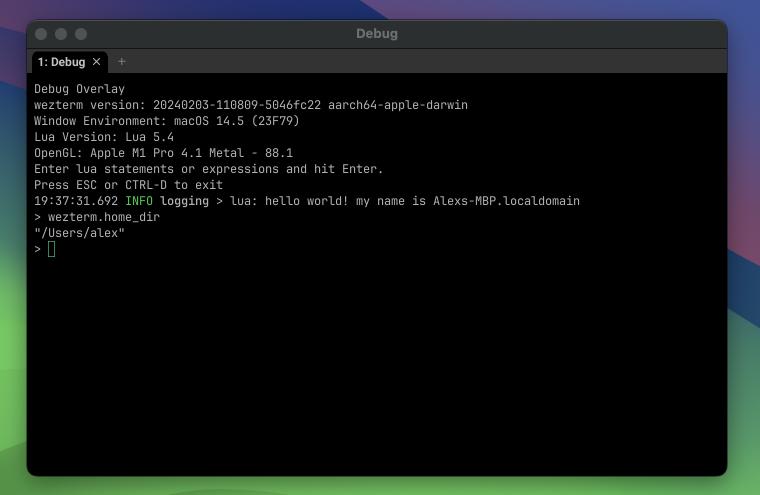
The combination of hot reloading and the debug overlay makes experimenting with WezTerm configs extremely low friction and low consequence. The feedback loop is so tight now it’s more like a feedback lp.
Configuring appearance
Okay enough gushing - let’s cut to the chase and make this thing prettier. Add a few lines to the config to start customising the look of the terminal. We’ll start with a colour scheme (docs):
-- Pick a colour scheme. WezTerm ships with more than 1,000!
-- Find them here: https://wezfurlong.org/wezterm/colorschemes/index.html
config.color_scheme = 'Tokyo Night'
Save, and you should immediately see it update. Thanks Wez!
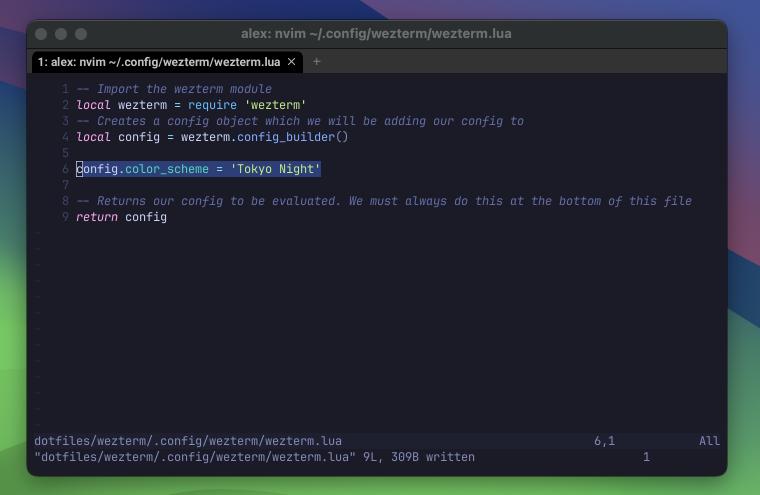
(if the hot config reload doesn’t work for whatever reason, you can manually reload it by pressing CMD + R).
Many colours, all at once
With over 1,000 colour choices to choose from, it’s tough to decide on your favourite. Why not outsource that work to your computer? Let’s explore the power of WezTerm’s dynamic config by randomly assigning a colour scheme for each new window you open:
-- Creates a lua table containing the name of every color scheme WezTerm
-- ships with.
local scheme_names = {}
for name, scheme in pairs(wezterm.color.get_builtin_schemes()) do
  table.insert(scheme_names, name)
end

-- When the config for a window is reloaded (i.e. when you save this file
-- or open a new window)...
wezterm.on('window-config-reloaded', function(window, pane)
  -- Don't proceed if the config has already been overriden, otherwise
  -- we'll enter an infinite loop of neverending colour scheme changes.
  -- If that sounds like your kinda thing, then remove this line ;) - but
  -- don't say you haven't been warned.
  if window:get_config_overrides() then return end
  -- Pick a random colour scheme name.
  local scheme = scheme_names[math.random(#scheme_names)]
  -- Assign it as an override for this window.
  window:set_config_overrides { color_scheme = scheme }
  -- And log it for good measure
  wezterm.log_info("Your colour scheme is now: " .. scheme)
end)
Open up a few windows (CMD + N on macOS) and each one will have a different colour scheme. A cornucopia of terminals, each more surprising than the last. We, my friends, are truly innovating now.
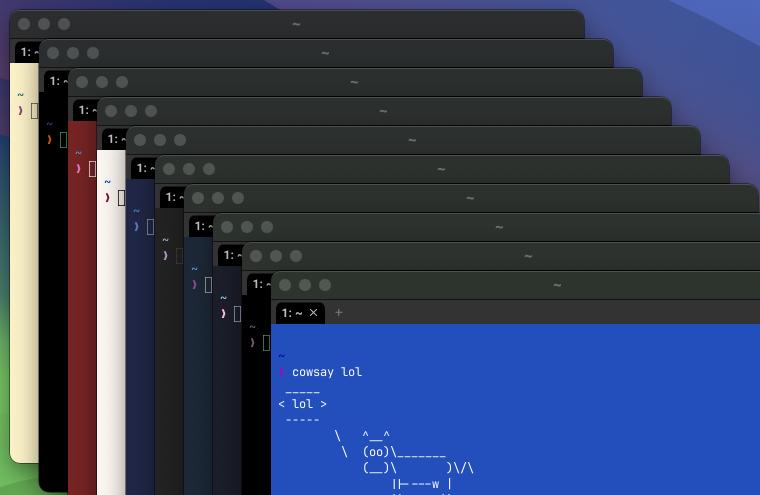
But really, that was kind of a dumb idea meant to prove a point. Now that you’ve gotten a taste for dynamic config, you probably wanna remove those lines and stick to a colour scheme you do like.
(You may find that after you remove that code and add your static color_scheme config back in, it doesn’t hot reload. That’s because our script set an override on the config specific to each window. To clear your overrides, you can go to your debug terminal and type window:set_config_overrides({}) - or you can just close and reopen your WezTerm window).
Respecting the system’s appearance
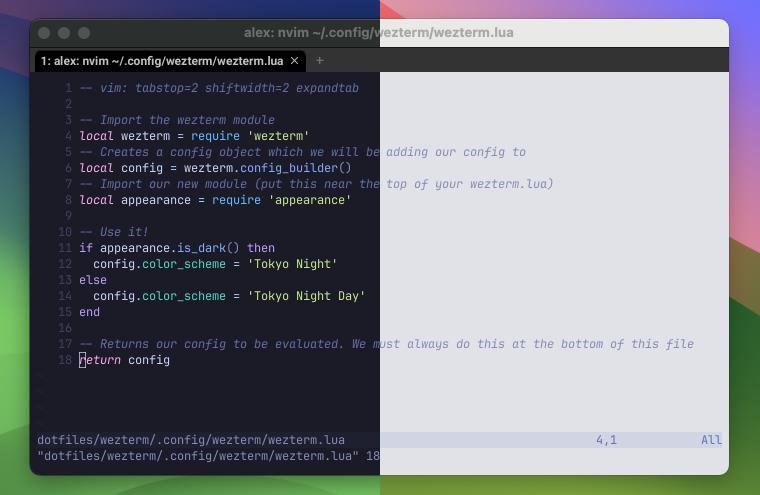
Light themes, dark themes… why not both? Let’s have the terminal’s colour scheme automatically change when the operating system’s appearance changes. While we’re at it, we’ll learn how to split up WezTerm config into different modules.
Create a new file alongside wezterm.lua and call it appearance.lua. Add this to it:
-- We almost always start by importing the wezterm module
local wezterm = require 'wezterm'
-- Define a lua table to hold _our_ module's functions
local module = {}

-- Returns a bool based on whether the host operating system's
-- appearance is light or dark.
function module.is_dark()
  -- wezterm.gui is not always available, depending on what
  -- environment wezterm is operating in. Just return true
  -- if it's not defined.
  if wezterm.gui then
    -- Some systems report appearance like "Dark High Contrast"
    -- so let's just look for the string "Dark" and if we find
    -- it assume appearance is dark.
    return wezterm.gui.get_appearance():find("Dark")
  end
  return true
end

return module
Back in wezterm.lua:
-- Import our new module (put this near the top of your wezterm.lua)
local appearance = require 'appearance'

-- Use it!
if appearance.is_dark() then
  config.color_scheme = 'Tokyo Night'
else
  config.color_scheme = 'Tokyo Night Day'
end
Toggle your system appearance between dark mode and light mode, and watch your theme change right before your eyes.
Fonts
Next up let’s look at fonts. WezTerm ships with the lovely JetBrains Mono, and Nerd Font Symbols (docs) so there’s nothing to complain about there. I do prefer Berkeley Mono at 13 points though, so:
-- Choose your favourite font, make sure it's installed on your machine
config.font = wezterm.font({ family = 'Berkeley Mono' })
-- And a font size that won't have you squinting
config.font_size = 13
There’s good support for ligatures and other fancy font settings if you’re into that (docs), but I’m not so let’s move on.
Window styling
Let’s style our terminal’s window. This controls the chrome that appears around it, and can vary between operating systems. On macOS, I like the below:
-- Slightly transparent and blurred background
config.window_background_opacity = 0.9
config.macos_window_background_blur = 30
-- Removes the title bar, leaving only the tab bar. Keeps
-- the ability to resize by dragging the window's edges.
-- On macOS, 'RESIZE|INTEGRATED_BUTTONS' also looks nice if
-- you want to keep the window controls visible and integrate
-- them into the tab bar.
config.window_decorations = 'RESIZE'
-- Sets the font for the window frame (tab bar)
config.window_frame = {
  -- Berkeley Mono for me again, though an idea could be to try a
  -- serif font here instead of monospace for a nicer look?
  font = wezterm.font({ family = 'Berkeley Mono', weight = 'Bold' }),
  font_size = 11,
}
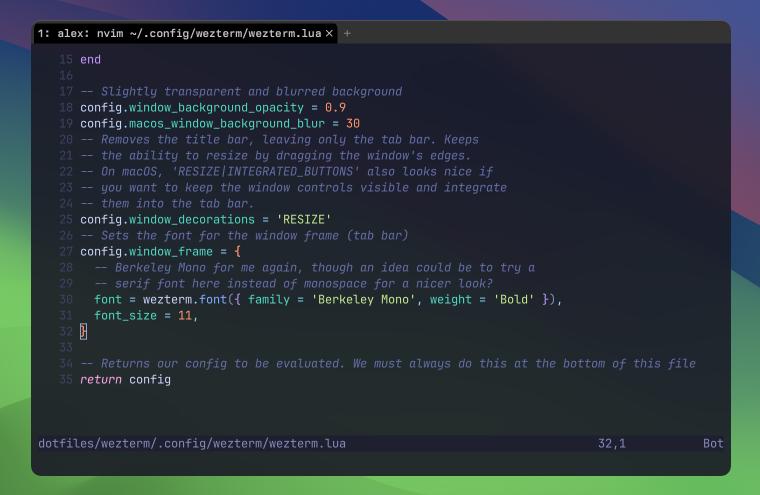
Now, let’s do something a little kitsch. See that empty space to the right of our terminal’s tab bar? Let’s fill it with a powerline looking status bar. We’ll add an update-status callback:
wezterm.on('update-status', function(window)
  -- Grab the utf8 character for the "powerline" left facing
  -- solid arrow.
  local SOLID_LEFT_ARROW = utf8.char(0xe0b2)

  -- Grab the current window's configuration, and from it the
  -- palette (this is the combination of your chosen colour scheme
  -- including any overrides).
  local color_scheme = window:effective_config().resolved_palette
  local bg = color_scheme.background
  local fg = color_scheme.foreground

  window:set_right_status(wezterm.format({
    -- First, we draw the arrow...
    { Background = { Color = 'none' } },
    { Foreground = { Color = bg } },
    { Text = SOLID_LEFT_ARROW },
    -- Then we draw our text
    { Background = { Color = bg } },
    { Foreground = { Color = fg } },
    { Text = ' ' .. wezterm.hostname() .. ' ' },
  }))
end)
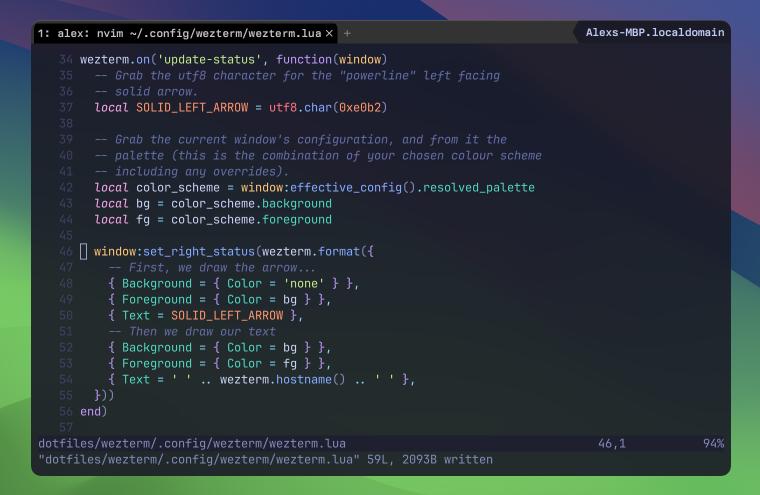
A few interesting things happening here:
- We just used WezTerm’s events API with
wezterm.on. Events are things that happen to the terminal (e.g. window resize) that we can define callbacks for. Theupdate-statusevent is emitted periodically when the terminal is ready to have its status updated. WezTerm manages this cleverly to ensure that only one such update can run at any given time, and if your code takes too long to execute, a timeout will be hit and your handler will be abandoned… protecting your terminal from bogging down. - We’re grabbing the
effective_config()of the window to get the “effective” configuration, which is the config with any overrides applied. From this we can get theresolved_palette, which is the currently active colour scheme. To see what this data looks like you can enter the debug overlay (CTRL + SHIFT + L) and executewindow:effective_config().resolved_palette. - We’re using the
wezterm.formatfunction (docs) to style our string with colours. Other ways you could format text include setting font weight, underlining text, and more. - Finally, the
wezterm.hostname()function (docs) gives us the hostname of the machine we’re running on. WezTerm ships with a bunch of useful functions for getting the state of your system, and also… we’re doing stuff in Lua - so you have full access to your file system, are able to make network requests, etc.
Altogether this gives us a powerline…ish. It’s a bit sad with only one segment isn’t it? Don’t you worry, we’ll be adding more soon…
Keys
Here’s the part where we justify our mechanical keyboard purchases. Let’s set up some key assignments. During this section we’ll look at WezTerm’s deep key handling capabilities and ability to take action based on your input.
By default, WezTerm defines some standard key assignments (docs). I leave them on because they’re very sensible, but if you wanna really wrest total control of your config, you can turn them off with config.disable_default_key_bindings = true.
Our first key assignment will be a humble start for us macOS users… you might be used to Option + Left Arrow and Option + Right Arrow jumping between words on your terminal. That’s the default in iTerm 2 and Terminal.app, but not in WezTerm. However, we can map it!
We do this by adding a keys table to our config:
-- Table mapping keypresses to actions
config.keys = {
  -- Sends ESC + b and ESC + f sequence, which is used
  -- for telling your shell to jump back/forward.
  {
    -- When the left arrow is pressed
    key = 'LeftArrow',
    -- With the "Option" key modifier held down
    mods = 'OPT',
    -- Perform this action, in this case - sending ESC + B
    -- to the terminal
    action = wezterm.action.SendString '\x1bb',
  },
  {
    key = 'RightArrow',
    mods = 'OPT',
    action = wezterm.action.SendString '\x1bf',
  },
}
By now you’ve probably figured out that you’re gonna be spending more time configuring WezTerm than doing actual work. There’s no shame in admitting this reality, so let’s encode it into our config. On macOS, the default shortcut for opening an application’s preferences is CMD + , - let’s make it so when we press this, our favourite editor opens up the WezTerm config. I’m using neovim, but feel free to substitute with your own:
config.keys = {
  -- ... add these new entries to your config.keys table
  {
    key = ',',
    mods = 'SUPER',
    action = wezterm.action.SpawnCommandInNewTab {
      cwd = wezterm.home_dir,
      args = { 'nvim', wezterm.config_file },
    },
  },
}
Try that out, but you may see an error along the lines of:
Unable to spawn nvim because:
No viable candidates found in PATH "/usr/local/bin:/usr/bin:/bin:/usr/sbin:/sbin"
If that error showed up, it’s typically because the process that launched WezTerm didn’t include a PATH environment variable that led to your editor’s binary (e.g. on macOS, Finder is usually WezTerm’s parent). We can work around this by specifying the full path to your editor in the SpawnCommandInNewTab properties (docs), or by updating the default environment variables WezTerm spawns commands with. I prefer the latter, since it means that any other places in our config where we might spawn new commands will also inherit the same env vars:
config.set_environment_variables = {
  PATH = '/opt/homebrew/bin:' .. os.getenv('PATH')
}
Try that again, and it should work.
We really are just scratching the surface of all the commands available (WezTerm supports a lot). In the next section, we’ll be growing our key bindings further.
Multiplexing terminals, levelling up key assignments
Let’s move on to WezTerm’s multiplexing capabilities. If you make use of a multiplexer (i.e. tmux) then you may consider using WezTerm’s builtin capabilities instead. They’ll generally give you a more integrated experience, with individual scrollback buffers per pane, better mouse control, easier selection functionality, and generally faster performance.
Hit CTRL + SHIFT + P to bring up WezTerm’s command palette. (Yes, WezTerm has a command palette. Yes, it’s as customisable as everything else we’ve seen so far. No, we won’t dwell on it here). Type split horizontally until the “Shell: Split Horizontally” option is selected and hit ENTER. Ta-da! Your shell split horizontally! Do the same for split vertically and… you get the idea.
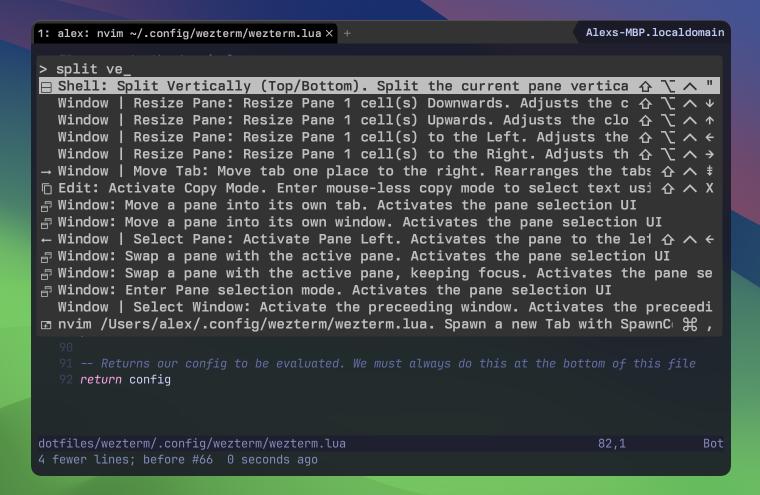
You may have noticed that the command palette displays the keyboard shortcut assigned to each action. The ones for splitting are quite a fingerful, e.g. SHIFT + CTRL + OPTION + ". I get why they’re this complicated - because they’re trying not to clash with any other shortcuts you may have on your system, but we can do a lot better - and WezTerm gives us the tools do so easily!
Splitting panes, leader key
A leader key (docs) is a special key combination that you press first, followed by another key combination, to perform a specific action. It can help you create complex shortcuts without needing to push a lot of keys all at once.
Sounds like a perfect fit for splitting panes, right? We’ll bind our leader to CTRL + A, and in case you accidentally type the leader without following it up with another key, we’ll have it automatically deactivate after 1,000 milliseconds.
-- If you're using emacs you probably wanna choose a different leader here,
-- since we're gonna be making it a bit harder to CTRL + A for jumping to
-- the start of a line
config.leader = { key = 'a', mods = 'CTRL', timeout_milliseconds = 1000 }
Next let’s define some key assignments for splitting panes:
config.keys = {
  -- ... add these new entries to your config.keys table
  {
    -- I'm used to tmux bindings, so am using the quotes (") key to
    -- split horizontally, and the percent (%) key to split vertically.
    key = '"',
    -- Note that instead of a key modifier mapped to a key on your keyboard
    -- like CTRL or ALT, we can use the LEADER modifier instead.
    -- This means that this binding will be invoked when you press the leader
    -- (CTRL + A), quickly followed by quotes (").
    mods = 'LEADER',
    action = wezterm.action.SplitHorizontal { domain = 'CurrentPaneDomain' },
  },
  {
    key = '%',
    mods = 'LEADER',
    action = wezterm.action.SplitVertical { domain = 'CurrentPaneDomain' },
  },
}
Give it a go now. Press CTRL + A, quickly followed by ", and you’ll get a horizontal split. Use the other assignment and you’ll get a vertical split.
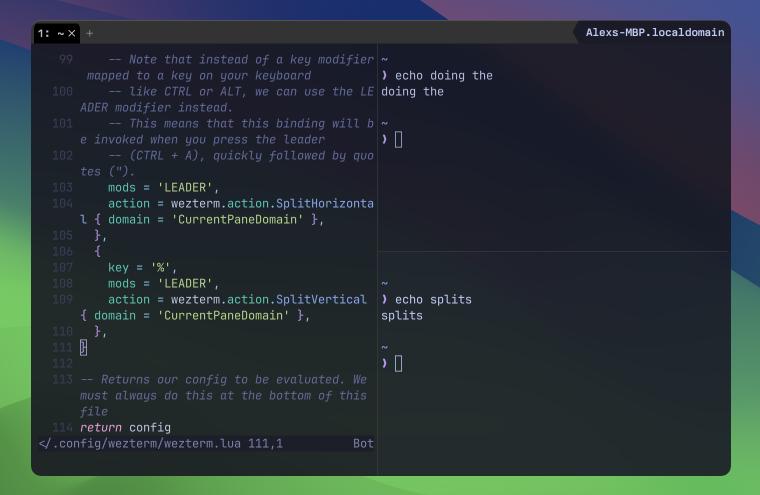
Before we move on - you might be wondering what happens if you actually want to send the CTRL + A keypress without invoking the leader? CTRL + A is useful in and of its own as pressing it jumps to the start of a line on your shell (and on operating systems like Emacs).
Well there’s a solution for that. We can map CTRL + A quickly followed by CTRL + A to send a CTRL + A to our terminal. That’s a confusing sentence! It’ll be simpler to just look at the config:
config.keys = {
  -- ... add these new entries to your config.keys table
  {
    key = 'a',
    -- When we're in leader mode _and_ CTRL + A is pressed...
    mods = 'LEADER|CTRL',
    -- Actually send CTRL + A key to the terminal
    action = wezterm.action.SendKey { key = 'a', mods = 'CTRL' },
  },
},
Moving around panes
Okay with that done, let’s get back to multiplexing. Next up, navigating our splits. I like to use vim direction keybindings, but feel free to replace with arrow keys instead.
config.keys = {
  -- ... add these new entries to your config.keys table
  {
    -- I like to use vim direction keybindings, but feel free to replace
    -- with directional arrows instead.
    key = 'j', -- or DownArrow
    mods = 'LEADER',
    action = wezterm.action.ActivatePaneDirection('Down'),
  },
  {
    key = 'k', -- or UpArrow
    mods = 'LEADER',
    action = wezterm.action.ActivatePaneDirection('Up'),
  },
  {
    key = 'h', -- or LeftArrow
    mods = 'LEADER',
    action = wezterm.action.ActivatePaneDirection('Left'),
  },
  {
    key = 'l', -- or RightArrow
    mods = 'LEADER',
    action = wezterm.action.ActivatePaneDirection('Right'),
  },
}
Look at all that duplication - We’re using a dynamic language for our config here, we don’t need to stand for that! Let’s go on a little side quest and see if we can extract it to a function.
local function move_pane(key, direction)
  return {
    key = key,
    mods = 'LEADER',
    action = wezterm.action.ActivatePaneDirection(direction),
  }
end

config.keys = {
  -- ... remove the previous move bindings, and replace with
  move_pane('j', 'Down'),
  move_pane('k', 'Up'),
  move_pane('h', 'Left'),
  move_pane('l', 'Right'),
}
Ooh so much smaller, but it could be smaller still. I dare you to keep code golfing this down to 6 lines. Go on - I believe in you!
Resizing panes, and introducing key tables
You might’ve figured out that you can resize panes by dragging the edge of one with your mouse, but we’re developers here, not olympic athletes. What’re we expected to move our hands away from the safety of our keyboard and over to the mouse?! No! I won’t stand for it and neither should you!
It’d be really nice to use the same keys that we use for moving between the panes for resizing (h, j, k, l)… but they’ve already been mapped… we could add another key modifier that needs to be held down when we want to resize vs. move between the panes:
config.keys = {
  -- ... add this new entry to your config.keys table
  {
    key = 'h',
    mods = 'LEADER|CTRL',
    -- "3" here is the amount of cells we wish to resize
    -- the terminal by
    action = wezterm.action.AdjustPaneSize { 'Left', 3 },
  },
}
But that’s no good really. We have to first push our leader CTRL + A, then push CTRL + H, and keep repeating that each time we wanna resize the pane to the left. Fingers getting sore. Send help. Oh, here comes WezTerm with the antidote: key tables.
When you activate a key table you’re entering a different mode with its own set of assignments for whatever you’re doing. This allows you to have multiple layers of assignments that are context specific.
It’s a similar kind of concept to the leader key, but unlike it, our key table will not automatically deactivate after an action is invoked, so it’ll be a good fit for resizing, where we want to keep pressing the same button over and over again until we’re happy with our pane’s new size.
With all that… this is easier done that said, so let’s check out the code:
local function resize_pane(key, direction)
  return {
    key = key,
    action = wezterm.action.AdjustPaneSize { direction, 3 }
  }
end

config.keys = {
  -- ... remove the yucky keybinding from above and replace it with this
  {
    -- When we push LEADER + R...
    key = 'r',
    mods = 'LEADER',
    -- Activate the `resize_panes` keytable
    action = wezterm.action.ActivateKeyTable {
      name = 'resize_panes',
      -- Ensures the keytable stays active after it handles its
      -- first keypress.
      one_shot = false,
      -- Deactivate the keytable after a timeout.
      timeout_milliseconds = 1000,
    }
  },
}

config.key_tables = {
  resize_panes = {
    resize_pane('j', 'Down'),
    resize_pane('k', 'Up'),
    resize_pane('h', 'Left'),
    resize_pane('l', 'Right'),
  },
}
Now you can push CTRL + A to activate leader, then R to activate the resizing layer… and movement keys to resize to your heart’s content. When 1,000 milliseconds have elapsed, you’ll automatically exit the resizing layer and be back to the default keytable.
WezTerm intensifies…
(While we’re on multiplexing, if you’re using neovim, I’d recommend checking out smart-splits.nvim - that’ll let you jump between your vim panes and your WezTerm ones).
Project workspaces
Okay let’s graduate from WezTerm university with one final assignment… project workspaces.
I’m often working across a few different projects at a time, and need to be able to quickly switch between them. I want each project to maintain its own multiplexer instance with its own windows, panes, and tabs. In tmux you might achieve this with different sessions. In WezTerm we’ll do it with workspaces.
Creating and switching between workspaces
Create a new file in your config directory and call it projects.lua. We’ll use this to provide some project switching functions to our main config file.
local wezterm = require 'wezterm'
local module = {}

local function project_dirs()
  return {
    '~/Projects/mailgrip',
    '~/Projects/alexplescan.com',
    '~/Projects/wezterm_love_letters',
    -- ... keep going, list all your projects
    -- (or don't if you value your time. we'll improve on this soon)
  }
end

function module.choose_project()
  local choices = {}
  for _, value in ipairs(project_dirs()) do
    table.insert(choices, { label = value })
  end

  -- The InputSelector action presents a modal UI for choosing between a set of options
  -- within WezTerm.
  return wezterm.action.InputSelector {
    title = 'Projects',
    -- The options we wish to choose from
    choices = choices,
    -- Yes, we wanna fuzzy search (so typing "alex" will filter down to
    -- "~/Projects/alexplescan.com")
    fuzzy = true,
    -- The action we want to perform. Note that this doesn't have to be a
    -- static definition as we've done before, but can be a callback that
    -- evaluates any arbitrary code.
    action = wezterm.action_callback(function(child_window, child_pane, id, label)
      -- As a placeholder, we'll log the name of what you picked
      wezterm.log_info("you chose " .. label)
    end),
  }
end

return module
… and in your wezterm.lua:
local projects = require 'projects'

config.keys = {
  -- ... add these new entries to your config.keys table
  {
    key = 'p',
    mods = 'LEADER',
    -- Present in to our project picker
    action = projects.choose_project(),
  },
  {
    key = 'f',
    mods = 'LEADER',
    -- Present a list of existing workspaces
    action = wezterm.action.ShowLauncherArgs { flags = 'FUZZY|WORKSPACES' },
  },
}
Lots going on here, take your time to read it and the comments. And give it a go! Push LEADER + P, and you’ll see the project input selector come up. Pick a project by highlighting one and pushing ENTER, or push CTRL + C to close the picker. Once you’ve picked a project you’ll see its directory logged to your debug overlay (CTRL + SHIFT + L).
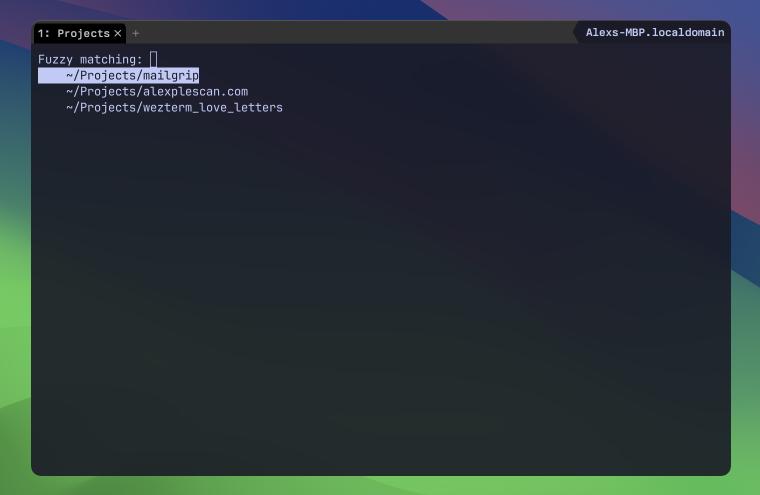
Still a couple of issues though… it’s really annoying to type out all your projects by hand in that file, and, uh, what was the other issue? Oh yeah! When you pick a project nothing happens. Okay, let’s fix these. Back in projects.lua, we’ll start by having the list of projects automatically populate.
-- The directory that contains all your projects.
local project_dir = wezterm.home_dir .. "/Projects"

local function project_dirs()
  -- Start with your home directory as a project, 'cause you might want
  -- to jump straight to it sometimes.
  local projects = { wezterm.home_dir }

  -- WezTerm comes with a glob function! Let's use it to get a lua table
  -- containing all subdirectories of your project folder.
  for _, dir in ipairs(wezterm.glob(project_dir .. '/*')) do
    -- ... and add them to the projects table.
    table.insert(projects, dir)
  end

  return projects
end
(This all assumes that you like to keep your projects grouped together in a folder, if not… well you’ve got Lua at your fingertips to implement whatever you want
Now launch the project picker, and what do you see? All those projects staring back at thee.
One thing left to do, let’s add the functionality that opens your project in a new WezTerm workspace. Still in projects.lua let’s change up choose_project:
function module.choose_project()
  local choices = {}
  for _, value in ipairs(project_dirs()) do
    table.insert(choices, { label = value })
  end

  return wezterm.action.InputSelector {
    title = "Projects",
    choices = choices,
    fuzzy = true,
    action = wezterm.action_callback(function(child_window, child_pane, id, label)
      -- "label" may be empty if nothing was selected. Don't bother doing anything
      -- when that happens.
      if not label then return end

      -- The SwitchToWorkspace action will switch us to a workspace if it already exists,
      -- otherwise it will create it for us.
      child_window:perform_action(wezterm.action.SwitchToWorkspace {
        -- We'll give our new workspace a nice name, like the last path segment
        -- of the directory we're opening up.
        name = label:match("([^/]+)$"),
        -- Here's the meat. We'll spawn a new terminal with the current working
        -- directory set to the directory that was picked.
        spawn = { cwd = label },
      }, child_pane)
    end),
  }
end
Try that out, select a new project, and you’ll see a workspace get created for it. Switch back to your default workspace (we bound so LEADER, CTRL + F to show you a list of active workspaces) and you’ll see everything is right where you left it.
Bonus: improving the powerline, and more colour stuff
Let’s add a couple of polishing touches to this workflow and then I promise we’ll be done…
Remember that sad powerline we set up earlier? Let’s make it happier by adding another segment to it which contains the name of the current workspace. In true powerline fashion, each subsequent segment on the powerline will display in a different colour. We’ll explore some of WezTerm’s colour maths support and do this all dynamically based on our theme. Back in wezterm.lua:
-- Replace the old wezterm.on('update-status', ... function with this:

local function segments_for_right_status(window)
  return {
    window:active_workspace(),
    wezterm.strftime('%a %b %-d %H:%M'),
    wezterm.hostname(),
  }
end

wezterm.on('update-status', function(window, _)
  local SOLID_LEFT_ARROW = utf8.char(0xe0b2)
  local segments = segments_for_right_status(window)

  local color_scheme = window:effective_config().resolved_palette
  -- Note the use of wezterm.color.parse here, this returns
  -- a Color object, which comes with functionality for lightening
  -- or darkening the colour (amongst other things).
  local bg = wezterm.color.parse(color_scheme.background)
  local fg = color_scheme.foreground

  -- Each powerline segment is going to be coloured progressively
  -- darker/lighter depending on whether we're on a dark/light colour
  -- scheme. Let's establish the "from" and "to" bounds of our gradient.
  local gradient_to, gradient_from = bg
  if appearance.is_dark() then
    gradient_from = gradient_to:lighten(0.2)
  else
    gradient_from = gradient_to:darken(0.2)
  end

  -- Yes, WezTerm supports creating gradients, because why not?! Although
  -- they'd usually be used for setting high fidelity gradients on your terminal's
  -- background, we'll use them here to give us a sample of the powerline segment
  -- colours we need.
  local gradient = wezterm.color.gradient(
    {
      orientation = 'Horizontal',
      colors = { gradient_from, gradient_to },
    },
    #segments -- only gives us as many colours as we have segments.
  )

  -- We'll build up the elements to send to wezterm.format in this table.
  local elements = {}

  for i, seg in ipairs(segments) do
    local is_first = i == 1

    if is_first then
      table.insert(elements, { Background = { Color = 'none' } })
    end
    table.insert(elements, { Foreground = { Color = gradient[i] } })
    table.insert(elements, { Text = SOLID_LEFT_ARROW })

    table.insert(elements, { Foreground = { Color = fg } })
    table.insert(elements, { Background = { Color = gradient[i] } })
    table.insert(elements, { Text = ' ' .. seg .. ' ' })
  end

  window:set_right_status(wezterm.format(elements))
end)
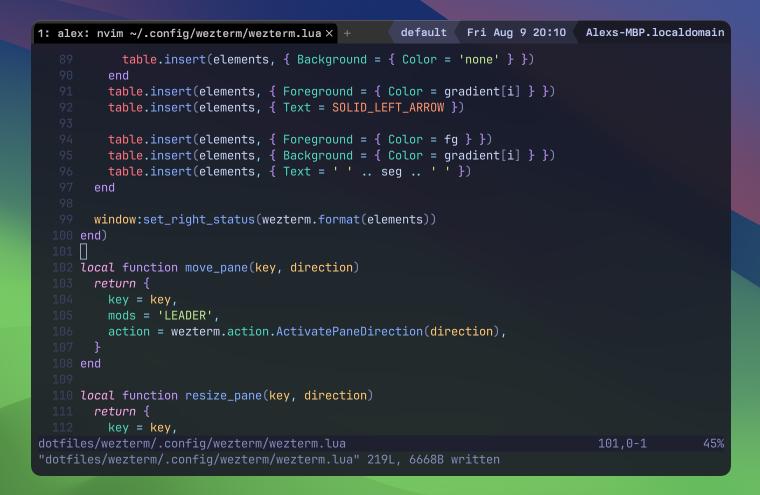
WezTerm delivers yet again. This updated callback supports arbitrary numbers of segments for its powerline. We’ve specified 3 but you could add way more. All this without needing to manually configure what colour we want on each segment, but rather have WezTerm do it for us by creating a gradient based on the currently active theme. Some highlights:
- We use
wezterm.color.parseto convert a string containing a hex colour code into aColorobject (docs) - this lets us perform more advanced operations on the color. - The colour scheme’s background colour is still what we want to use as the value that our gradient draws to, but to figure out where the gradient should start, we use either
color:darken(docs) orcolor:lightento create a new colour. - The gradient itself is made with
wezterm.color.gradient(docs), which returns a table containing a evenly spaced colours between ourgradient_toandgradient_from. - We then iterate over our powerline segments to create the items required for
wezterm.format.
Where to from here?
There’s a lot more that WezTerm does and that you can do with WezTerm. By now you’ll have a good understanding of WezTerm config fundamentals, but I encourage you to keep exploring!
If you’ve followed this guide step by step, I’d recommend pruning the config down to things that you’ll actually use, rewriting it in your own style, then start sprinkling in your own stuff. Take ownership of this thing! Make your own beautiful WezTerm snowflake!
When you want some inspiration for what you could do next, browse through the WezTerm API docs to see what’s possible.
And if you find that you too really like WezTerm, please consider supporting Wez for his great open-source work.